
"In the soft, warm bosom of a decaying compost heap, a transformation from life to death and back again is taking place. Life is leaving the living plants of yesterday, but in their death these leaves and stalks pass on their vitality to the coming generations of future seasons. Here in a dank and mouldy pile the wheel of life is turning." .....Rodale, Encyclopedia of Organic Gardening.
HOW TO MAKE COMPOST
WHAT IS COMPOST?
Compost is what happens in Nature when leaves fall to the ground, are moistened by rain, and then slowly decay, releasing their nutrients back into the life-cycle of the soil. You may have made compost inadvertently, by leaving a heap of weeds or garden wastes sitting through the winter; and in the spring found, under the shrunken pile, a layer of fine, crumbly material that looked like fluffly soil.
Making an active compost pile simply accelerates the natural process. All the ingredients are put together consciously and kept moist so that decomposition is rapid, enabling as many nutrients as possible to be retained by the compost.
WHY MAKE COMPOST?
Compost can be used as a fertilizer, but more importanly, it is a soil amendment or conditioner, that improves the structure of the soil and increases the microbiological activity, enabling nutrients to be more readily available to the plants. Compost improves the drainage and the moisture retention of the soil. Another very good reason for making compost is to make use of garden refuse, kitchen trimmings and livestock manure and bedding.
INGREDIENTS
A compost pile is made with layers of organic material. The organic matter that you make the layers out of should be alternated between moist and dry material. The chart, Common Materials for Compost is divided into DRY, MOIST and ACTIVATOR groups to give a general guide for what would be considered which. Something green and succulent or something that is high in Nitrogen (such as poultry bedding) would be classified as MOIST, even if it isn't "wet", and the DRY group has the coarse and dry things, such as leaves and straw, even though they may be moist with water.

SOME MATERIALS FOR COMPOST |
||
|---|---|---|
| DRY | MOIST | ACTIVATOR |
| Straw | Animal bedding | Manure |
| Rice Hulls | Fresh Green Weeds | Cottonseed Meal |
| Leaves (not Black Walnut or Eucalyptus |
Apple Pomace | Blood Meal |
| Dry Weeds | Kitchen trimmings | Old Compost |
| Cornstalks (shredded or chopped) |
Grape Pomace | Dirt |
| Sawdust (use with caution use extra Nitrogen Avoid Redwood) |
Seaweed | Soybean meal |
| Dry Tomatoe plants | Seaweed | Comfrey Leaves |
| Dry Flower stalks | Fresh Garden Trimmings | Commercial Fertilizer |
| Dry Bean and Squash vines | Lawn Clippings (only use in 3 in. or less layer!) |
Alfalfa Meal or Pellets |
There are no hard and fast rules about which is DRY and which is MOIST, only general guidelines. Even in the FINE POINTS section, the Carbon/Nitrogen Ratios, on which the "moist" and "dry" classifications are based, are only approximate. Using the basic concept of alternating layers of what you assume is moist and dry should work just fine, particularly with the use of thin ACTIVATOR layers, which will probably pick up any slack.
TO MAKE THE COMPOST PILE
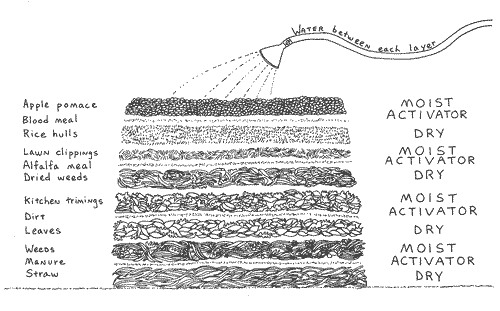
Spread a six-inch layer of something DRY, such as straw, dry weeds, leaves, or rice hulls, on the ground ( 4ft. by 4 ft. is a good size for a small compost pile).
Sprinkle a thin layer of an ACTIVATOR, such as manure, blood meal, alfalfa pellets, cottonseed meal, dirt, or old compost, onto the dry layer.
Water that layer, but don't get it soggy.
Next, add a six-inch layer of MOIST material, such as fresh animal bedding, green weeds, garden cuttings, kitchen vegetable trimmings, or apple pomace. (Lawn-mower grass clippings are a good moist material, however they should only be used in a three-inch thick layer. A thicker layer of mower clippings may mat down and rot, becoming slimy and smelly).
Water the moist layer lightly
Add another dry layer,
......add another activator layer
............and then another moist layer.
Water every layer lightly.
Continue alternating layers until the pile is about four feet high, or all your materials are used up.
Some people cover the finished pile with a layer of dirt or a sheet of plastic. This isn't necessary unless you are in a very hot, dry climate and the pile will dry out too quickly, or if the weather is very rainy, the plastic sheet will keep the pile from getting waterlogged. In dry weather, watering the top of the compost pile when it looks dry is usually adequate.
TURNING THE COMPOST PILE
After about three weeks, you can turn the pile. The more you turn the pile the faster it will become compost. "Turning" the compost is taking it from the original pile and making a new pile, tossing and stirring the material so air is incorporated - speeding decomposition and mixing all the ingredients. Also, material from the outside of the pile can then be put in the center where the pile is actively decomposing.
A pitchfork is the ideal tool to use, but a garden fork or shovel will work. Once again, as when making the pile originally, moisten every layer, but don't get it soggy. Occasionally, if the pile is not kept moist enough, a white "mold" appears, coating a lot of the material in the pile. This disappears when the pile is turned and moistened.
TIMING
Every three weeks is an approximate schedule for turning the compost pile. Ideally you would turn the pile when decomposition starts to slow down (or cool) in the middle of the pile. The compost pile really does heat up; a pile with a lot of fresh manure in it can be uncomfortably warm when you stick your finger into the center of it. An active compost pile can get hot enough (as high as 160 degrees F) to kill weed seeds. Depending on the materials used to make the pile and the weather (compost happens faster in the summer), two turning may be enough to give you finished compost.
MAKING THE PILE BIT BY BIT OR ALL AT ONCE.
You can store or stockpile the materials for a compost pile and construct it all at one time, or you can make it progressively, adding material when you have it; just keep in mind the concept of alternating Dry, Moist, and Activator layers.
One way to set up a composting system is to stockpile leaves, keeping them dry, or buy a bale of straw, for the dry layers. Keep a plastic trash can with an Activator, such as alfalfa pellets, cottonseed meal or manure, near the composting site. That way, when moist material is available, you can construct the appropriate layers.
WHEN IS THE COMPOST DONE?
You know the compost is "done" when you can no longer recognize the materials that went into the pile. Everything will be a uniform brown color and will be crumbly when you handle it.
A compost pile will shrink noticeably as it decomposes. Remember to keep the pile moist.
If you leave a compost pile sitting too long it will turn into soil; good soil, but not the partially decomposed organic matter that we want to add to our gardens. Organic matter is valuable to the soil only while it is decaying, providing humic acids, improving the structure of our soil as it slowly finishes decomposing.
DIFFERENT METHODS
There are a lot of methods and physical set-ups for making compost........
- You can buy or make drums that allow you to turn the compost every few days just by rotating the drum
- You can also make or purchase bins of concrete, plastic, or wood.
- One good idea is to have a roof over your compost piles. The shade keeps the pile from drying out too fast in the summer, and in the winter the pile is protected from excessive rain.
- The 14 DAY METHOD is very fast and efficient. All the material is shredded before being piled up and moistened. The pile is turned every two or three days and in about two weeks you have finished compost.
- PIT or TRENCH COMPOSTING is an older method that some people still use. The compost pile is constructed in a pit or trench dug in the ground. The pile is either turned in place or the pile is left for worms from the surrounding soil to come in and do the work.
- A compost pile can be layered up in the same way as the active pile, kept moist, and alowed to sit without turning. Within three-to-six months, you will probably have good, usable compost, particularly in the interior of the pile.
- "COLD" COMPOST is an even simpler method. Simply pile garden wastes as they occur, adding a thin layer of "activator" from time to time. Rain or the garden hose provides the moisture. Usually, within a year, the pile will have shrunk considerably and a large part of the interior will be decomposed and usable. Since this type of pile doesn't heat up from active decomposition, you don't have the traditional method's advantage of killing weed seeds. Cold compost is actually an effective way to deal with garden waste, somewhat slow, but not requiring a lot of labor or attention.
There are almost as many ways to make compost as people doing it. If some way works for you, do it.
FINE POINTS
CARBON TO NITROGEN RATIO (C/N) refers to the proportion of Carbon to Nitrogen in organic material. Carbon is a basic element in all organic matter and life; being the basis of carbohydrates, it is a large part of the physical structure of plants. Nitrogen is an essential element that is in all protiens.
There is an approximate ideal C/N ratio for compost of 30/1, or 30 times as much Carbon as Nitrogen. This can only be an approximate ratio, because Nitrogen is a gaseous element and can be leached or dissipated easily. There are charts available that list C/N ratios for some of the materials used in compost, and these can be used as general guides to the relative relationship of Carbon to Nitrogen.
As a comparative example, consider these approximate Carbon to Nitrogen ratios.......
- Sawdust has a Carbon/Nitrogen ratio of 400/1
- Oat straw has a C/N of 80/1
- Shredded corn stalks are 60/1
- Fresh green weeds 20/1
- Chicken manure 15/1
- Cottonseed meal is 5/1
Remembering that the ideal ratio is about 30/1 for making compost, we try to achieve a relative balance between the drier, coarser materials like straw (80/1) and the more succulent, gooey, "alive" materials, such as fresh green weeds (20/1) or chicken manure (15/1)
A lot of the materials we think of as "activators", such as cottonseed meal (5/1) and blood meal, have Nitrogen "locked up" within them. They can be stored dry and used to "balance" the pile when we only have a lot of dry high-carbon materials. In the same way, dry leaves or straw can be used to balance the C/N ratio in the pile when there are too many succulent weeds.
PROBLEMS
......will it smell bad?
Yes, a compost pile may smell for a few days when it is first made, if there is a lot of manure in it. You can put a plastic sheet over it for a week or so, if you have close neighbors.
......what if it doesn't heat up?
If the pile doesn't heat up, think about the balance of dry to moist. Possibly you need to turn the pile and add a sprinkling of an activator between the layers. The other possibility is that the pile is too dry; without adequate moisture decomposition cannot happen.
AVOIDING PROBLEMS
Don't dump the fireplace ashes on the compost pile. A sprinkling of ashes between the layers is fine, but any more than that can disturb the chemical balance of the pile.
PESTS
Ants can often invade a compost pile, particularly when the ground is saturated from rain; the pile offering a nice warm, dry home. Usually, turning and moistening the pile a couple of times, a few days apart, will convince the ants to leave.
NEVER include meat or fat scraps in the kitchen trimmings you put in the compost pile. This will eliminate one of the major attractions for cats, dogs, and rats. Sometimes bins constructed of hardware cloth are necessary - constructed so the top and one side are removable, in order to have access for turning the pile. When rats are a serious problem, a suspended, rotating drum composter may be the only way to keep them out. Constructing the pile only with garden waste, not adding kitchen trimmings, may lessen the attraction for critters, if they are a problem.
If fly larvae are in your pile (I have never actually seen this, but I know people worry about it), the compost is most likely too wet or too overloaded with the "moist" (or high nitrogen) material. Turn the pile to aerate it, and if there seems to be a lot of sludgy, rotting material, add a dry material between the layers as you turn it.
HAPPY COMPOSTING!
Copyright 2000 by Heidi Freestone All Rights Reserved
To reproduce for other than personal use please ask for permission.
Contact heidi@heidifreestone.com